Translate this page into:
Frozen shoulder release: Ten-step technique
*Corresponding author: Vinay K. Pandey, Department of Orthopedics, Kalyani Knee and Shoulder Clinic, Varanasi, Uttar Pradesh, India. docvkpandey@hotmail.com
-
Received: ,
Accepted: ,
How to cite this article: Pandey VK. Frozen shoulder release: Ten-step technique. J Arthrosc Surg Sports Med. 2024;5:41-4. doi: 10.25259/JASSM_8_2022
Abstract
Frozen shoulder is a condition associated with painful restriction of shoulder joint movement. This condition has a prevalence of 2–5% in the general population, seen most often in females and the diabetic population. It is essentially a self-limiting condition passing through stages of freezing, frozen, and thawing. It has been reported that up to 90% of patients recover with conservative measures. Patients with more severe initial symptoms, younger age at the time of onset, and reduction in motion despite four months of compliance with therapy are most likely to require surgery. The author presents ten-step techniques for frozen shoulder release in cases of failed conservative trials in the management of frozen shoulder.
Keywords
Frozen shoulder
Adhesive capsulitis
Frozen shoulder release
INTRODUCTION
Frozen shoulder usually occurs in the age group of 40–60 years and has a prevalence of 2–5% in the general population, with prevalence in the diabetic population reaching up to 20%. The female population is four times more affected than males.
Primary frozen shoulder is idiopathic and is associated with diabetes mellitus, hypothyroidism, adrenal disease, hyperlipidemia, cardiopulmonary disease, and inflammatory polyarthralgia. Secondary frozen shoulder is associated with identifiable shoulder pathologies such as rotator cuff tendinopathy, calcific tendinitis, fracture, and dislocation. Studies have shown that a frozen shoulder is essentially a self-limiting condition wherein more than 90% of the population responds to conservative treatment. Levine reported that patients with more severe initial symptoms, younger age at the time of onset, and reduction in motion despite four months of compliance with therapy are most likely to require surgery.[1] The author presents ten comprehensive steps to perform adequate release of a frozen shoulder. It is recommended to use a radio-frequency (RF) probe for performing frozen shoulder release. Arthroscopic shaver, being an aggressive device, should be used less often. The ten steps are as follows:
10-STEP SURGICAL TECHNIQUES
Surgery is performed under general anesthesia in a lateral position. The affected arm is put in traction with 5 kg weight and abducted to 60°. The shoulder landmarks are marked.
Step 1 - Shoulder entry: A posterior portal is created. The thinner profile Wissinger rod is kept on standby for entering into the joint space. The direction of entry is important so as not to damage humeral head cartilage. Shoulder traction and gentle manipulation in the form of forward flexion help in entering the shoulder joint.
Step 2 - Create a working portal: A 16G needle is used to mark the trajectory of the anterior portal [Figure 1a]. A thinner profile Wissinger rod is first used to create an anterior track, and a dilator is used to enlarge the track [Figure 1b].
Step 3 - Anterior interval release: An adequate anterior interval release is paramount. One needs to spend more time releasing scar tissue from interval space. RF probe keeps bleeding in check and so must be used during the whole procedure [Figure 2].
Step 4 - Middle glenohumeral ligament (MGHL) release: A cord-like MGHL should be released with a punch or RF probe [Figure 3].
Step 5 - Anterior capsule release: An adequate anterior capsular release is ensured by visualizing the muscle tissue after doing release. At this step, the joint space starts opening. Anterior capsular release is carried down into the antero-inferior capsule. At this point portals are changed [Figure 4].
Step 6 - Change portal: The arthroscope is put into the anterior portal, and the RF probe is put into the posterior portal.
Step 7 - Posterior capsule release: An adequate posterior capsular release is ensured by visualizing the muscle tissue after doing release. Posterior capsular release is carried down into the postero-inferior capsule [Figure 5a and b].
Step 8 - Inferior capsular release: Care must be taken into releasing the inferior capsule as scarring might pull the axillary nerve close to the rim. Keeping the RF probe facing towards the rim and working close to the rim can avoid iatrogenic injury to the axillary nerve [Figure 6a and b].
Step 9 - Fine-tune release: Removal of residual fibrous tissue to be done using a shaver device [Figure 7].
Step 10 - Confirm adequate release: Putting traction to the arm should open up the joint space, allowing free movement of instruments. Also, one should be able to visualize muscle tissue after release, hinting toward adequacy of release [Figure 8a and b].
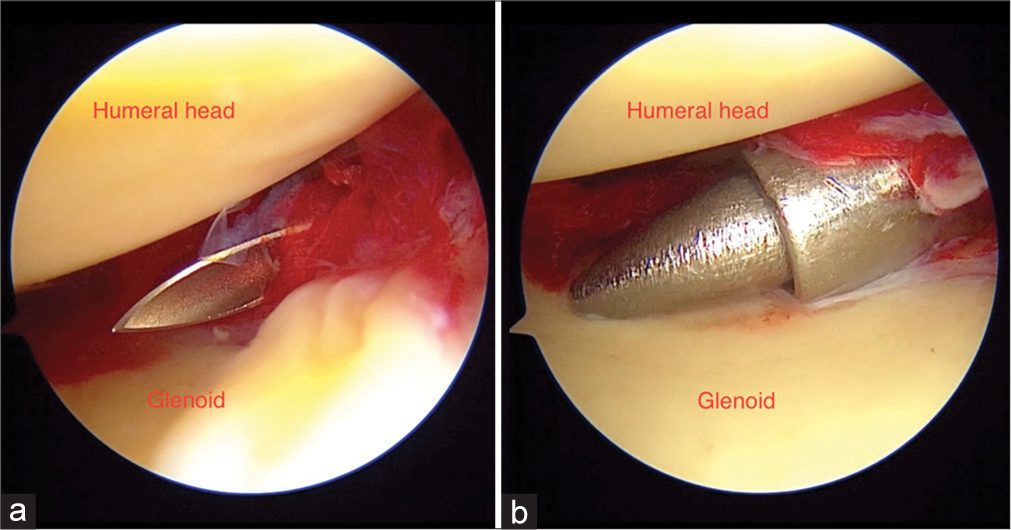
- Left shoulder: (a and b) Showing working portal creation and gradual dilation.
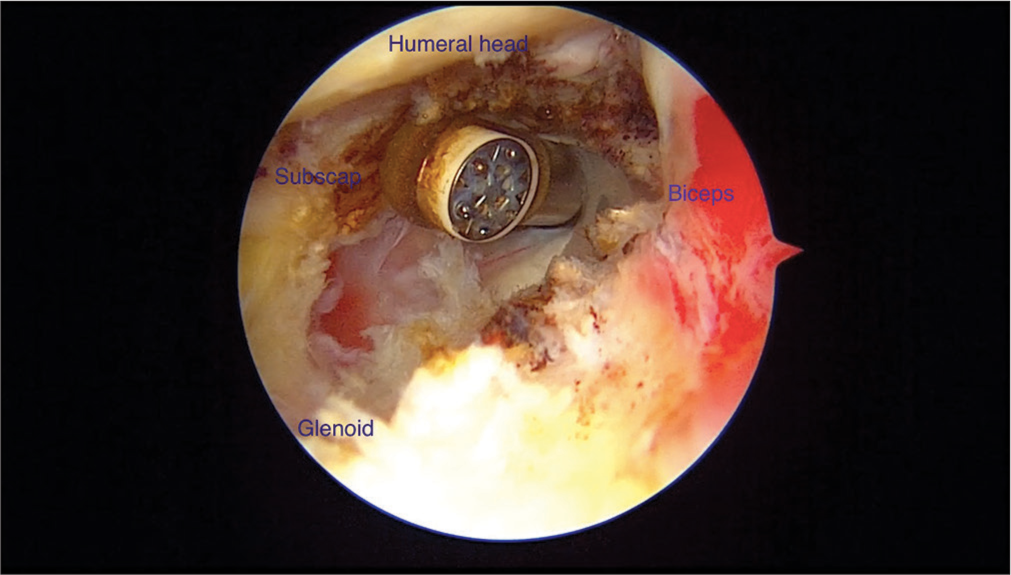
- Left shoulder: Rotator interval release.
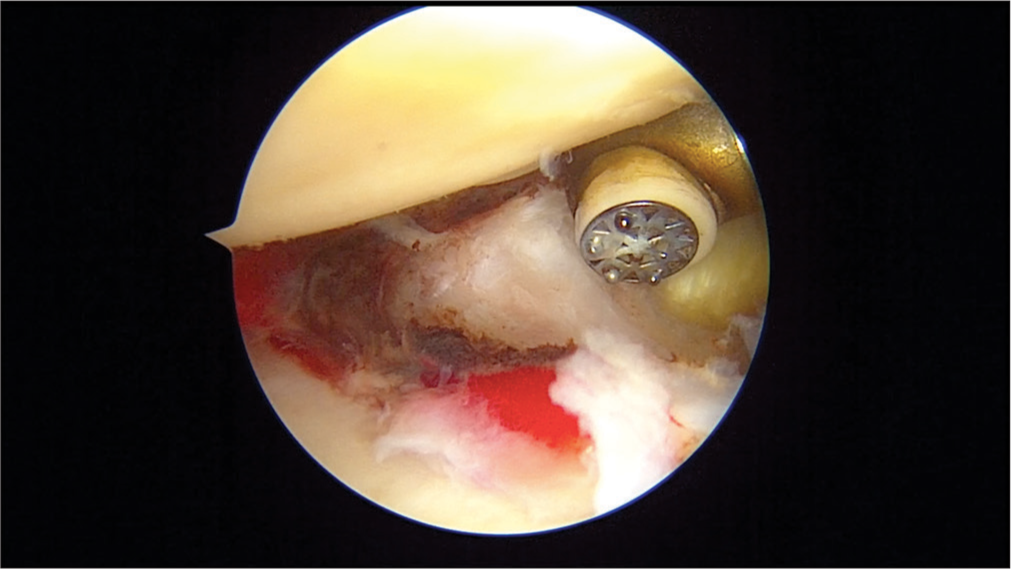
- Left shoulder: middle glenohumeral ligament release.
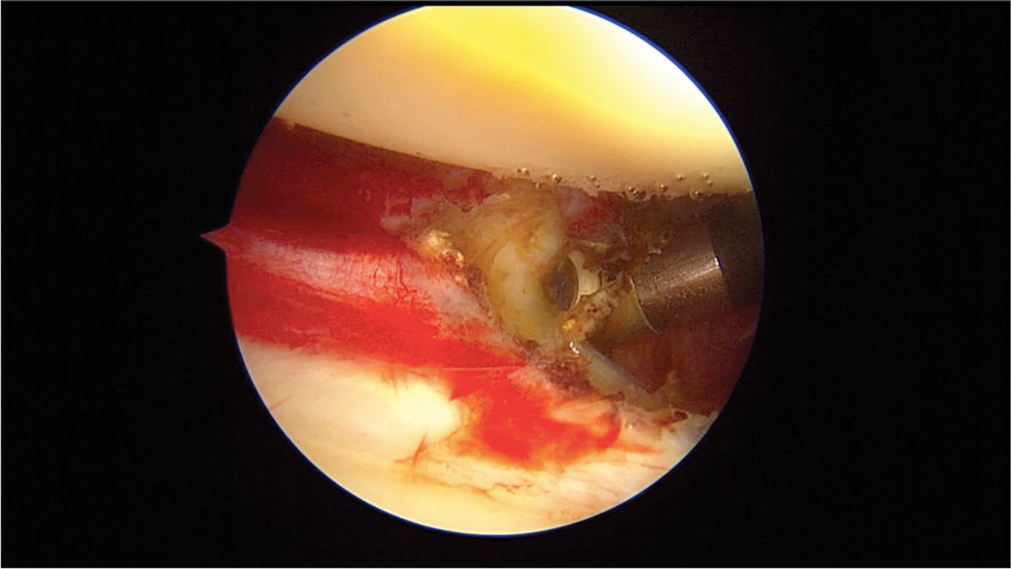
- Left shoulder: Anterior capsule release.
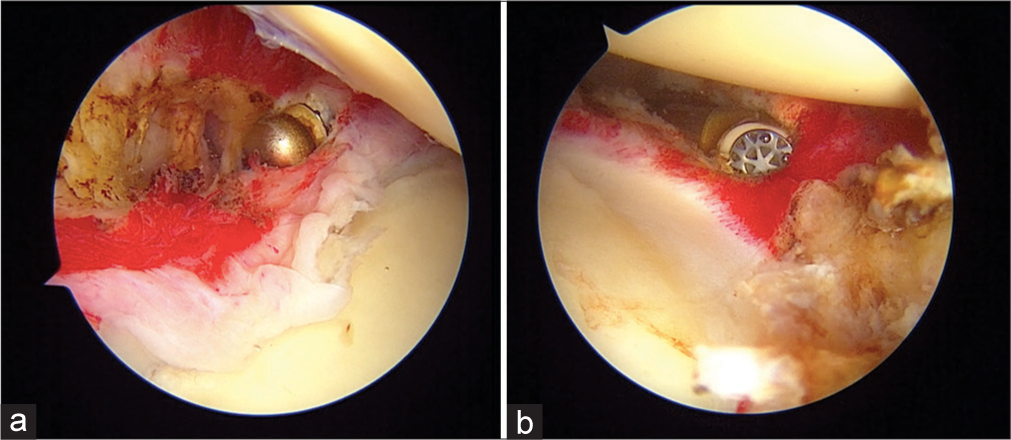
- (a) Left shoulder: Posterior capsule release. (b) Left shoulder: Posterior inferior capsule release.
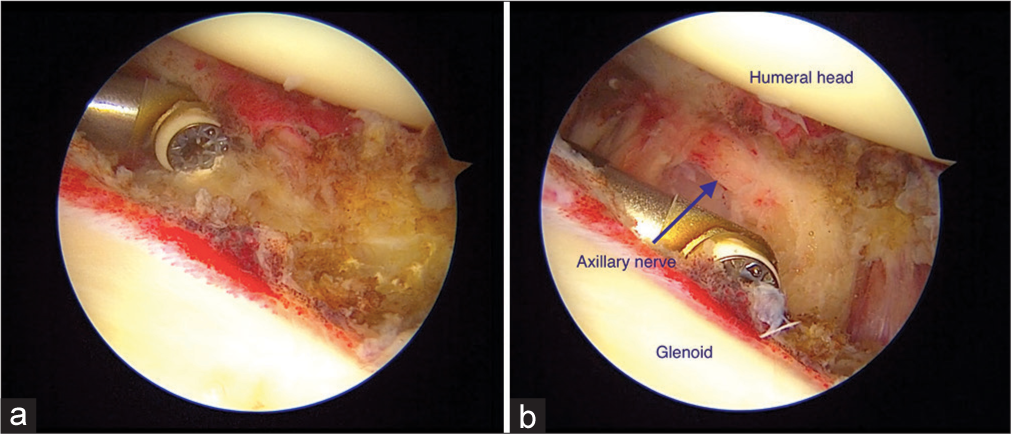
- (a) Left shoulder: Inferior capsule release. (b) Left shoulder: Careful for axillary nerve during inferior capsular release.
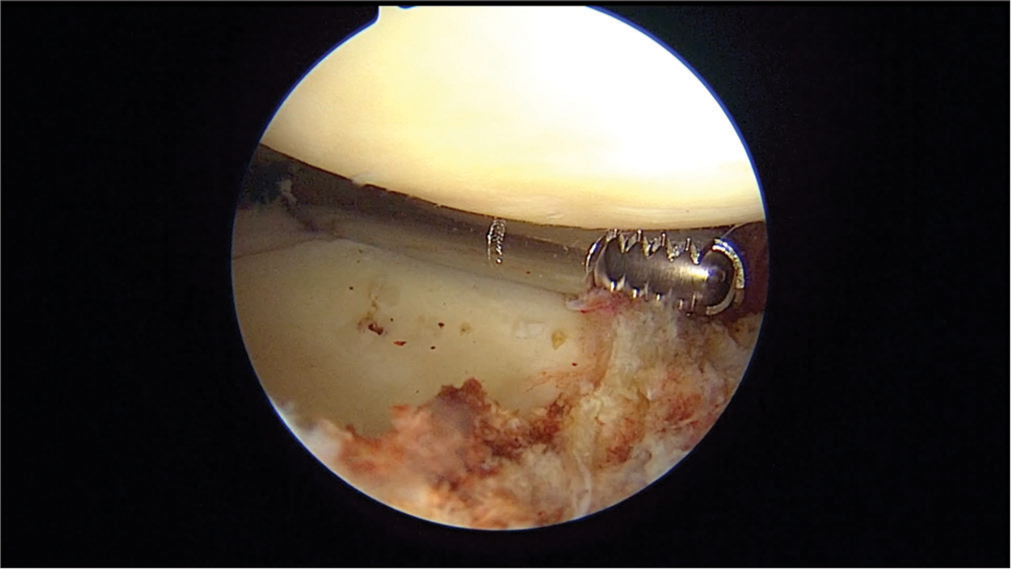
- Left shoulder: Fine-tune release by resecting residual bands of fibrous tissue.
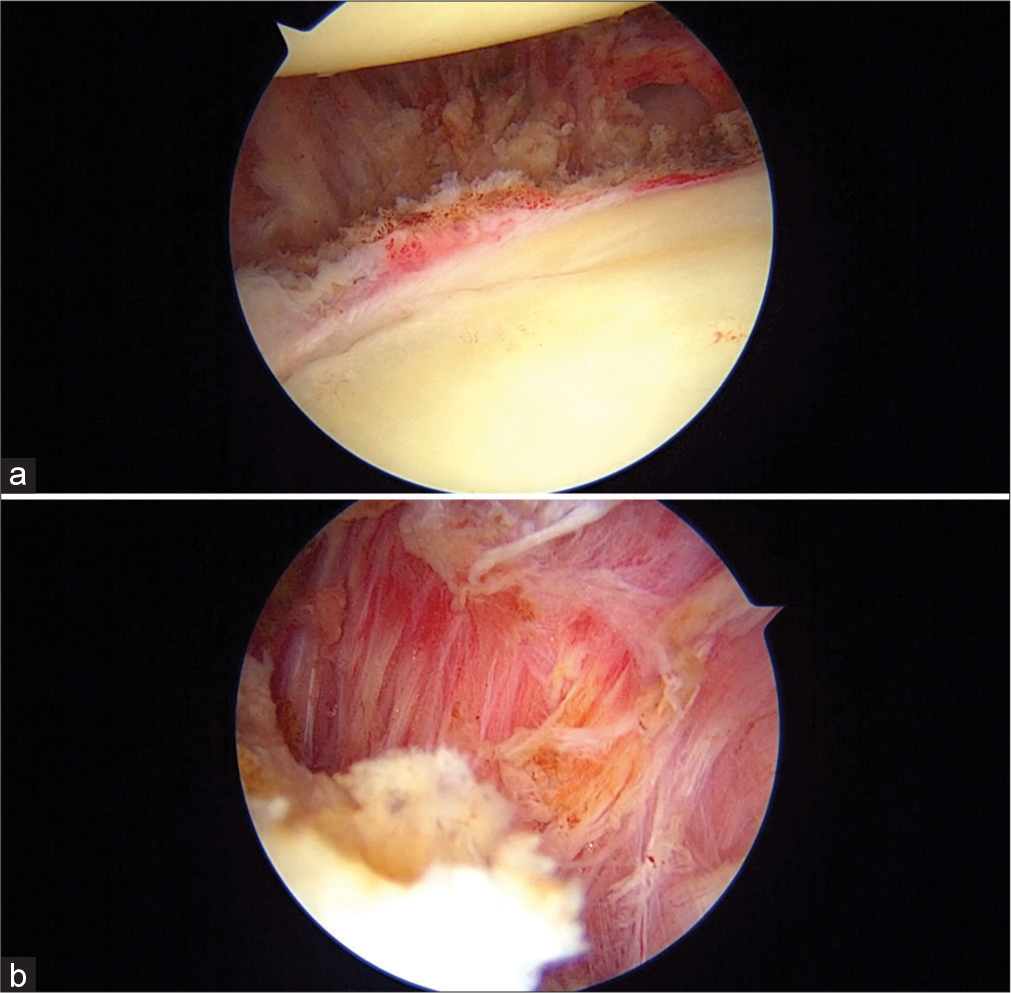
- Left shoulder: (a and b) Showing adequacy of release by visualization of muscle tissue.
POSTOPERATIVE REGIME
Post-surgery, the shoulder is put in an arm pouch. The author recommends that on postoperative day 1, department physiotherapy is started with passive range of motion (ROM) exercises. Special emphasis is given to external rotation and abduction exercises. Active-assisted, followed by active ROM exercise, is encouraged as soon as the postsurgical pain permits. Home physiotherapy is encouraged three times a day.
DISCUSSION
Although a frozen shoulder is a self-limiting condition, some patients have inadequate outcomes with conservative management.[2] Levine reported that patients with more severe initial symptoms, younger age at the time of onset, and reduction in motion despite four months of compliance with therapy are most likely to require surgery.[1] Persistent painful restriction of motion despite 3–6 months of non-operative management including medication, local injections, or physiotherapy, is an indication for surgery.[2]
Various modalities of the management of frozen shoulders are being practiced among surgeons based on personal experience and training, ranging from physiotherapy, intraarticular injection, manipulation under anesthesia (MUA), and arthroscopic release. The arthroscopic release being more controlled as compared to MUA, with the ability to address intra-articular and subacromial disease, has gained popularity as a favored surgical intervention in the management of frozen shoulder. Le Lievre and Murrell showed significant improvement in ROM, pain relief, and function after seven years of arthroscopic capsular release.[3]
Performing arthroscopy in an early phase of a frozen shoulder can be difficult as synovitis might obscure arthroscopic vision. However, Rizvi et al. identified that patients who underwent arthroscopic capsular release during the early clinical phase (<10 months) of idiopathic adhesive capsulitis demonstrated greater improvements in ROM and strength six months after surgery.[4]
There are various methods described in the literature for frozen shoulder release ranging from partial release to 360° release. The author’s ten-step technique helps in following a step-by-step pattern of release, which makes a seemingly difficult procedure more predictable and reproducible [Table 1].
| Steps | Technical pearls |
|---|---|
| Step 1 | 1. Keep thinner profile Wissinger rods 2. Direction of entry important (not to damage humeral head cartilage) 3. Manipulation before arthroscopy (forward flexion only). |
| Step 2 | Not enough space to put cannulas Use RF probe for working (90° probe is useful). |
| Step 3 | Anterior interval release must be thorough (Joint starts opening with interval release) |
| Step 4 | MGHL (usually cord-like) release is important |
| Steps 5 and 7 | Must be able to visualize muscle tissue for adequacy of release |
| Step 8 | 1. Keep close to the rim to avoid iatrogenic injury to the axillary nerve 2. Face of RF facing rim. |
| Step 9 | Any residual band of fibrous tissue must be released. |
| Step 10 | Abduction of the shoulder must open up joint space for instruments to move freely. |
RF: Radio-frequency, MGHL: Middle glenohumeral ligament
The author recommends performing arthroscopic capsular release in a lateral decubitus position. The advantages of lateral decubitus position are improved ability to use traction to increase visualization, particularly in the axillary recess and inferior glenohumeral joint, and improved cerebral perfusion. Moreover, capsular tissues are under tension, facilitating selective release and visualization of completed release due to capsular retraction after release.
It is imperative to get adequate capsular release. Visualization of underlying muscle tissue hints at the adequacy of release. In the author’s opinion, adequate capsular release is the single most important factor determining success of the procedure in getting painless and improved ROM during the post-operative phase.
A 90° radio frequency device seems to be the most versatile one to perform the resection with. The use of arthroscopic shaver and punches for capsular resection might lead to bleeding and inadequate arthroscopic visualization vision.
The author feels that although the addition of posterior release significantly improved ROM (abduction and internal rotation) in short-term follow-up after arthroscopic capsular release, it does not offer significant improvements in function or internal rotation in long-term follow-up.
The primary concern regarding the release of the inferior capsule is injury to the axillary nerve due to its proximity to the axillary nerve. Kim and Lee reported that axillary nerve damage can be prevented if the electrocautery tip stays within 10 mm of the glenoid rim. Staying close to the glenoid rim between 5 and 7 o’clock, keeping the face of RF Probe under vision and facing toward the arthroscope helps in avoiding iatrogenic injury of the axillary nerve.[5]
After surgery, it is important to start postoperative rehabilitation as soon as possible. An arm pouch is given for a few days to control pain. It is important to perform adequate release with visualization of muscle tissue; this will obviate the need for continuous inter-scalene catheter for anesthetic infusion in the early postoperative period to improve pain relief. Patients are encouraged to perform home physiotherapy three times a day.
CONCLUSION
Arthroscopic release of a frozen shoulder is a reliable treatment method with a low complication rate for restoring function and reducing pain. It is a technically demanding procedure that requires patience and step-by-step release. The single most important factor determining painless improved ROM in the postoperative phase is adequate capsular release with visualization of muscle tissue. Patients should begin progressive ROM exercises as soon as possible under the supervision of a trained therapist.
Ethical approval
The Institutional Review Board approval is not required.
Declaration of patient consent
Patient’s consent not required as patient identity is not disclosed or compromised.
Conflicts of interest
There are no conflicts of interest.
Use of artificial intelligence (AI)-assisted technology for manuscript preparation
The authors confirm that there was no use of artificial intelligence (AI)-assisted technology for assisting in the writing or editing of the manuscript and no images were manipulated using AI.
Financial support and sponsorship
Nil.
References
- Nonoperative management of idiopathic adhesive capsulitis. J Shoulder Elbow Surg. 2007;16:569-73.
- [CrossRef] [PubMed] [Google Scholar]
- Shoulder stiffness: Current concepts and concerns. Arthroscopy. 2016;32:1402-14.
- [CrossRef] [PubMed] [Google Scholar]
- Long-term outcomes after arthroscopic capsular release for idiopathic adhesive capsulitis. J Bone Joint Surg Am. 2012;94:1208-16.
- [CrossRef] [PubMed] [Google Scholar]
- Factors affecting the outcomes of arthroscopic capsular release for idiopathic adhesive capsulitis. Orthop J Sports Med. 2019;11:7(9).
- [CrossRef] [PubMed] [Google Scholar]
- Essential surgical technique for arthroscopic capsular release in the treatment of shoulder stiffness. JBJS Essent Surg Tech. 2015;5:e14.
- [CrossRef] [PubMed] [Google Scholar]


